Firmware Upgrade
1 Overview
Firmware upgrade can fix known issues of lidar, improve performance and add new functions, which is an important operation to ensure the normal operation of the lidar products.
This document introduces 4 different firmware upgrade methods in detail. Users can choose the most suitable method according to the actual situation and follow the corresponding steps to complete the firmware upgrade.
2 Quick Start
The following is a comparison table of Hesai lidar product models and applicable firmware upgrade methods:
| Series | Model | HTTP Web Upgrade | LidarUtilities Upgrade | Command Upgrade |
|---|---|---|---|---|
| Pandar | Pandar128E3X | ✓ | — | HTTP command |
| Pandar | Pandar64 | ✓ | — | HTTP command |
| Pandar | Pandar40P | ✓ | — | HTTP command |
| QT | PandarQT | ✓ | — | HTTP command |
| QT | QT128C2X | ✓ | — | HTTP command |
| XT | PandarXT | ✓ | — | HTTP command |
| XT | PandarXT-16 | ✓ | — | HTTP command |
| XT | XT32M2X | ✓ | — | HTTP command |
| AT | AT128E2X | ✓ | — | HTTP command |
| AT | AT128E3X | — | ✓ | PTC command (0xFF) |
| AT | ATX | — | ✓ | PTC command (0x83) |
| AT | ATXP | — | ✓ | PTC command (0x83) |
| JT | JT128 | — | ✓ | PTC command (0x83) |
| JT | JT64P | — | ✓ | PTC command (0x83) |
| JT | JT16 | — | ✓ | Serial port command |
| JT | JT32 | — | ✓ | Serial port command |
| ET | ETX | — | ✓ | PTC command (0x83) |
| ET | ETXP | — | ✓ | PTC command (0x83) |
| FT | FT120 | — | ✓ | PTC command (0xFF) |
| FT | FTX140/180 | — | ✓ | PTC command (0x83) |
| OT | OT128 | — | ✓ | PTC command (0x83) |
Upgrade Notes
-
Power outage is strictly prohibited during the entire upgrade process: If power is cut off halfway, the lidar firmware would be damaged and cannot be used, requiring factory repair.
-
Official firmware upgrade patchs must be used: Hesai firmware upgrade patchs are strictly corresponding to lidar models. Do not use third-party or other model upgrade patchs, otherwise compatibility issues may occur during the upgrade process.
-
Guarantee stable network connection before upgrade: Ensure stable network connection during the entire upgrade process to avoid connection issue, which may lead to upgrade failure.
3 Upgrade Method 1: HTTP Webpage
Do not power off or disconnect during the upgrade process, otherwise the lidar firmware may be damaged (bricked) and require factory repair.
3.1 Pre-upgrade Preparation
Please confirm the following preparations before upgrading:
- The host device and the lidar are on the same LAN, and the lidar IP can be pinged successfully (refer to Ethernet Configuration).
- The correct upgrade patch file corresponding to the product model has been obtained from Hesai.
3.2 Operation Steps (Take Pandar128E3X as an example)
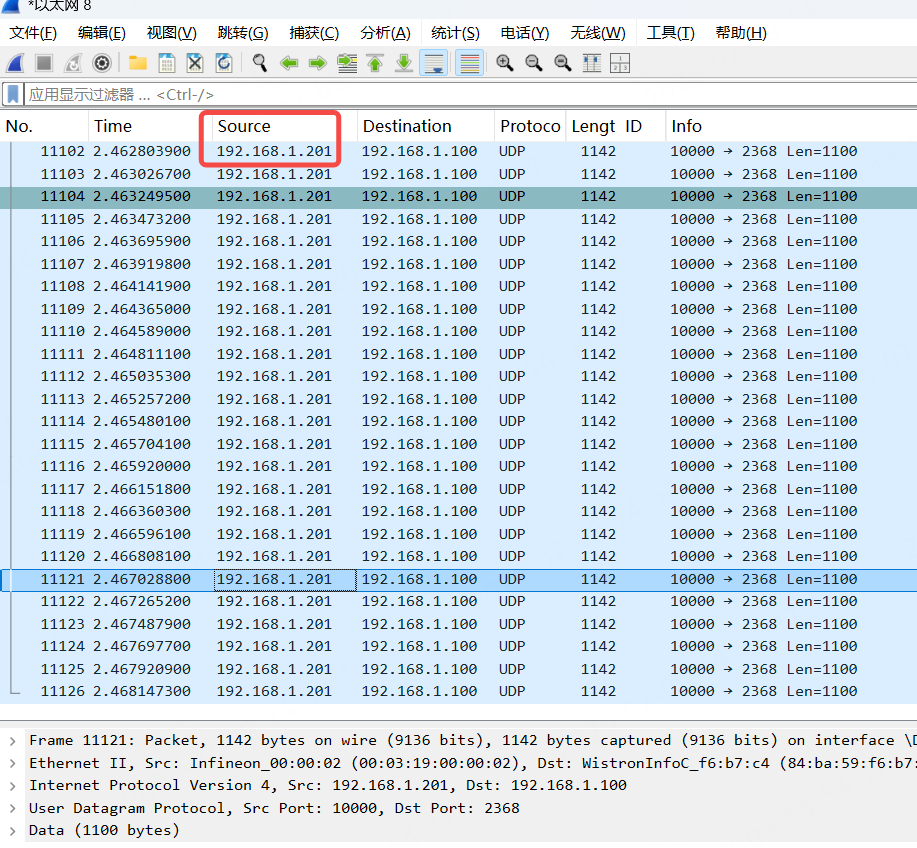
- Verify network connection: Press Win+R on the host, enter cmd to open the command line, and execute
ping 192.168.1.201. A reply indicates that the network is normal. If the ping fails, check the network cable connection, IP address, whether the operating device and the lidar are on the same network segment, and whether VLAN is configured. - Enter the upgrade page: Open the browser, enter the lidar IP (such as
192.168.1.201) in the address bar and press Enter, click the Upgrade tab at the top of the page to enter the upgrade page.

-
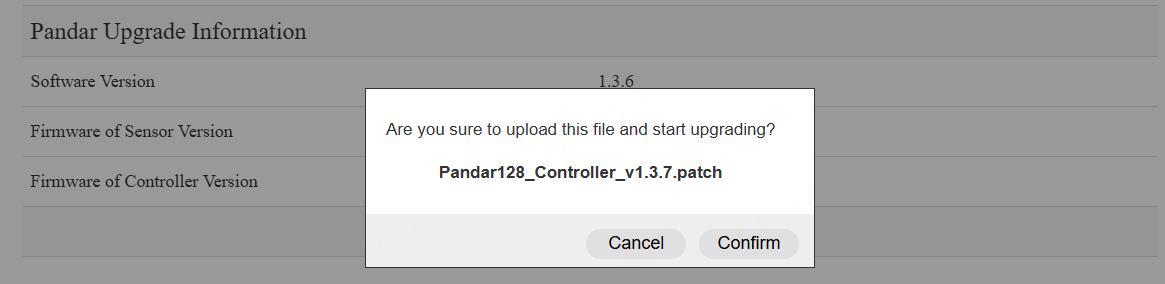
Upload the upgrade patch: Click the Upload button on the Upgrade page, select the downloaded patch upgrade patch in the pop-up window and confirm.
Note: The folder path where the upgrade patch is located cannot contain Chinese characters, otherwise identification may fail. The upgrade patch file name varies with product models. For example, the upgrade patch for Pandar128 is named
Pandar128_Controller_v1.3.7.patch, and different file names may be used for other models.
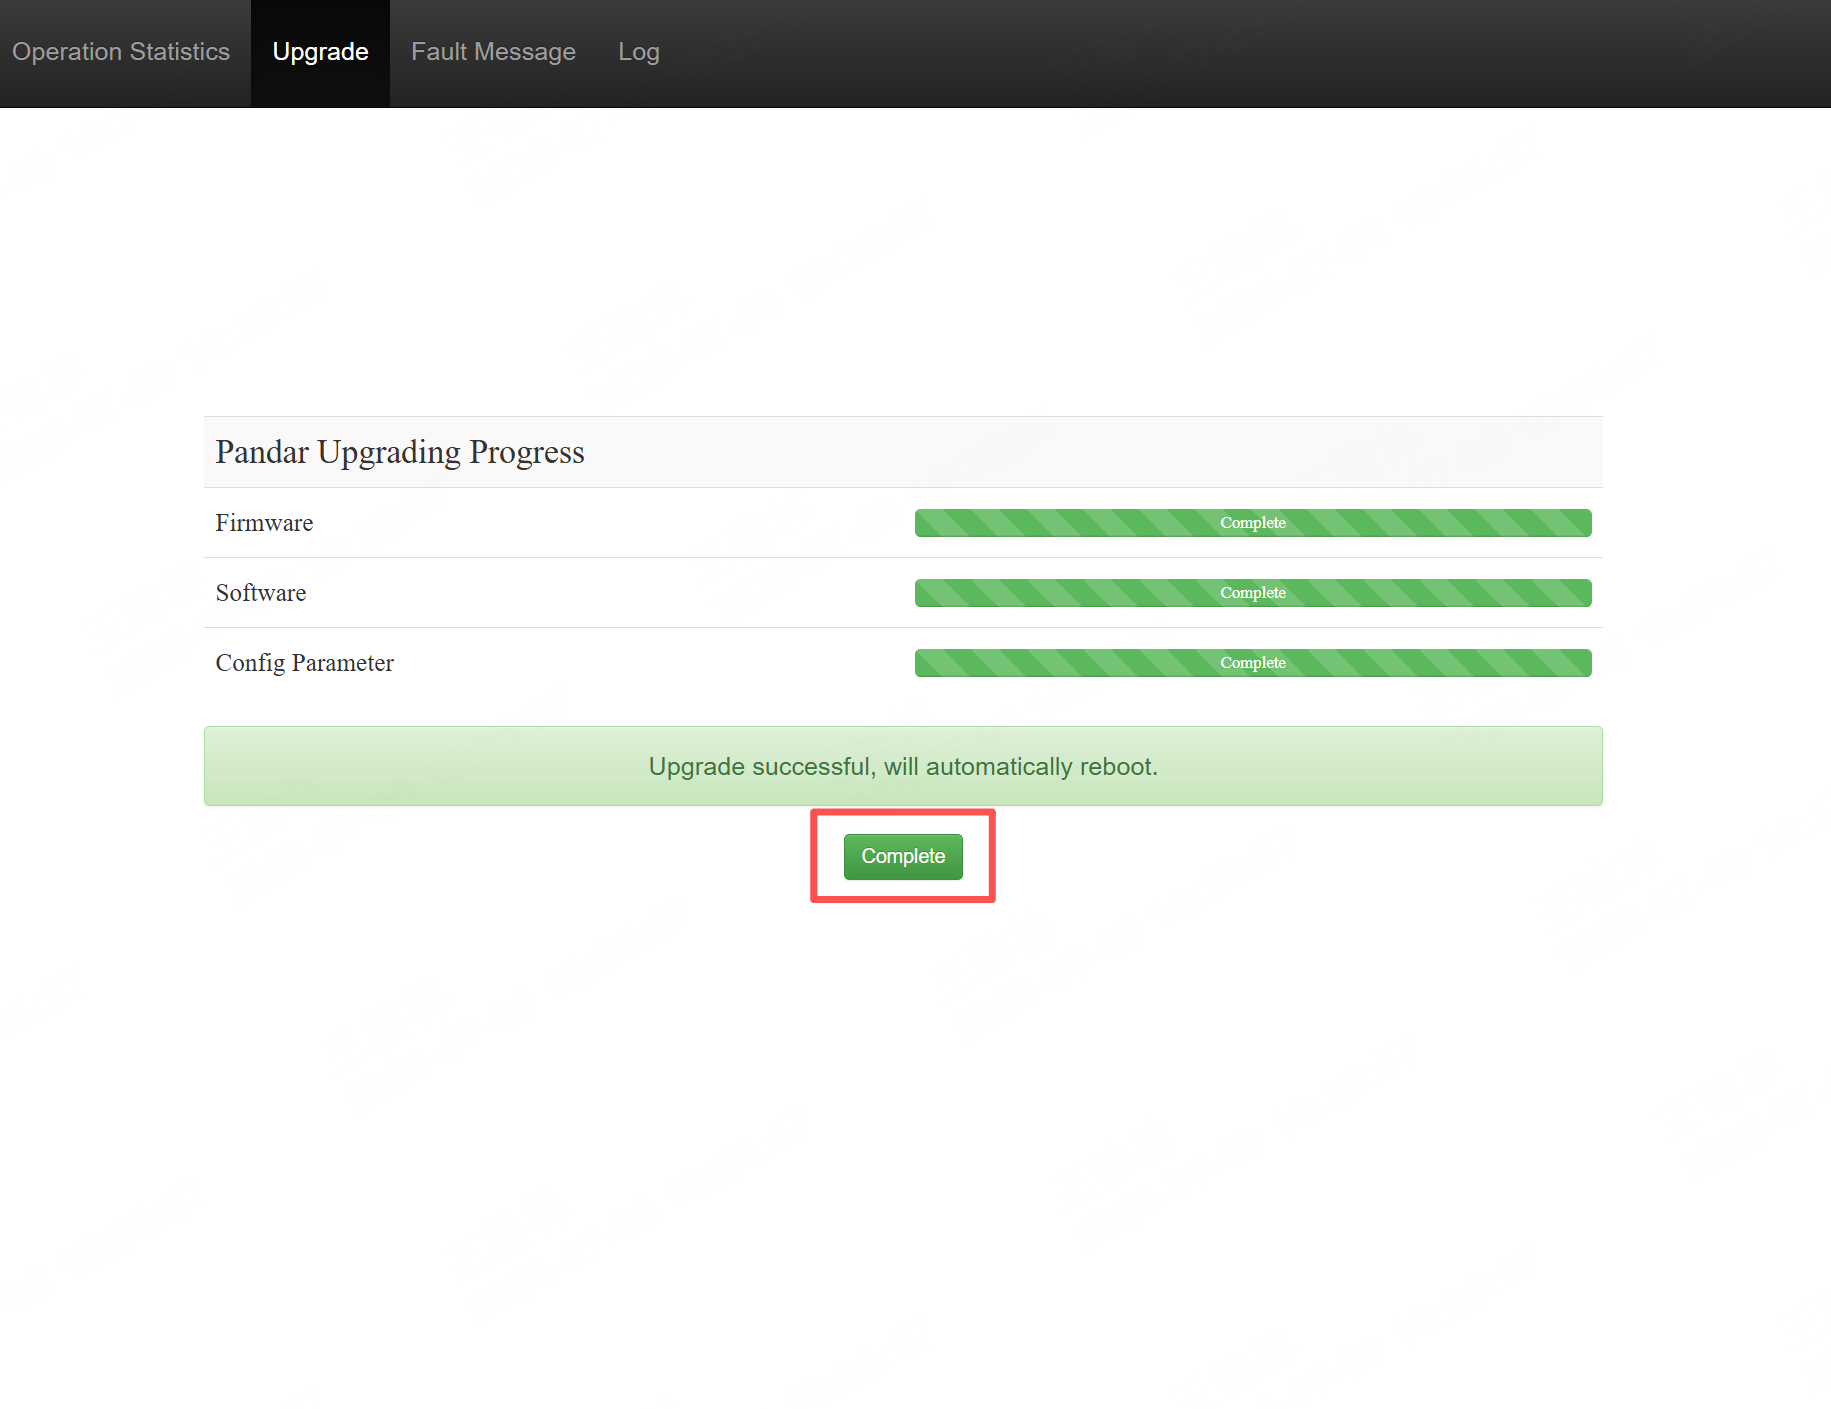
- Wait for the upgrade to complete: The upgrade starts automatically after upload. When the progress bar turns green and displays Complete, click it to finish the upgrade process. Do not close the browser or refresh the page during the upgrade process.
3.3 Confirm Successful Upgrade
User can confirm whether the upgrade is successful through the following method:
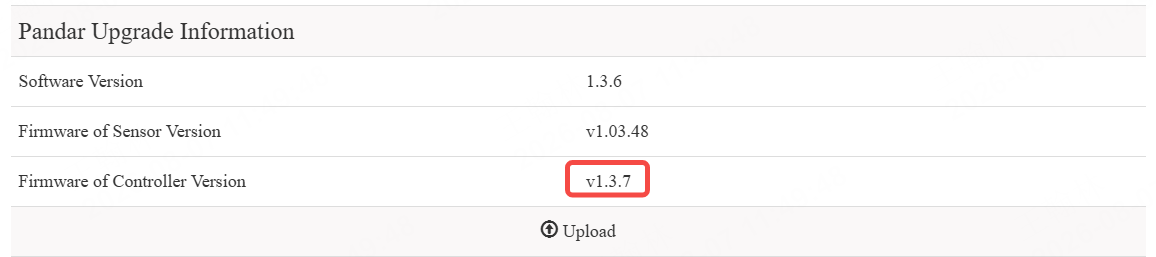
Check the firmware version number: Refresh the Upgrade page of the lidar web interface and check the displayed firmware version number. If it is consistent with the target version number, the upgrade is successful.
4 Upgrade Method 2: LidarUtilities
Do not power off or disconnect during the upgrade process, otherwise the lidar firmware may be damaged (bricked) and require factory repair.
4.1 Pre-upgrade Preparation
Please confirm the following preparations before upgrading:
- PandarView or LidarUtilities has been obtained from Hesai and installed.
- The host device and the lidar are on the same LAN, and the lidar IP can be pinged successfully (refer to Ethernet Configuration).
- The correct upgrade patch file corresponding to the product model has been obtained from Hesai.
4.2 Operation Steps (Take JT128 as an example)
- Connect the lidar: Open the LidarUtilities tool, enter the lidar IP address and PTC port (PTC communication port of Hesai lidar, usually 9347) on the connection interface, click the Connect button and wait for the connection to succeed.
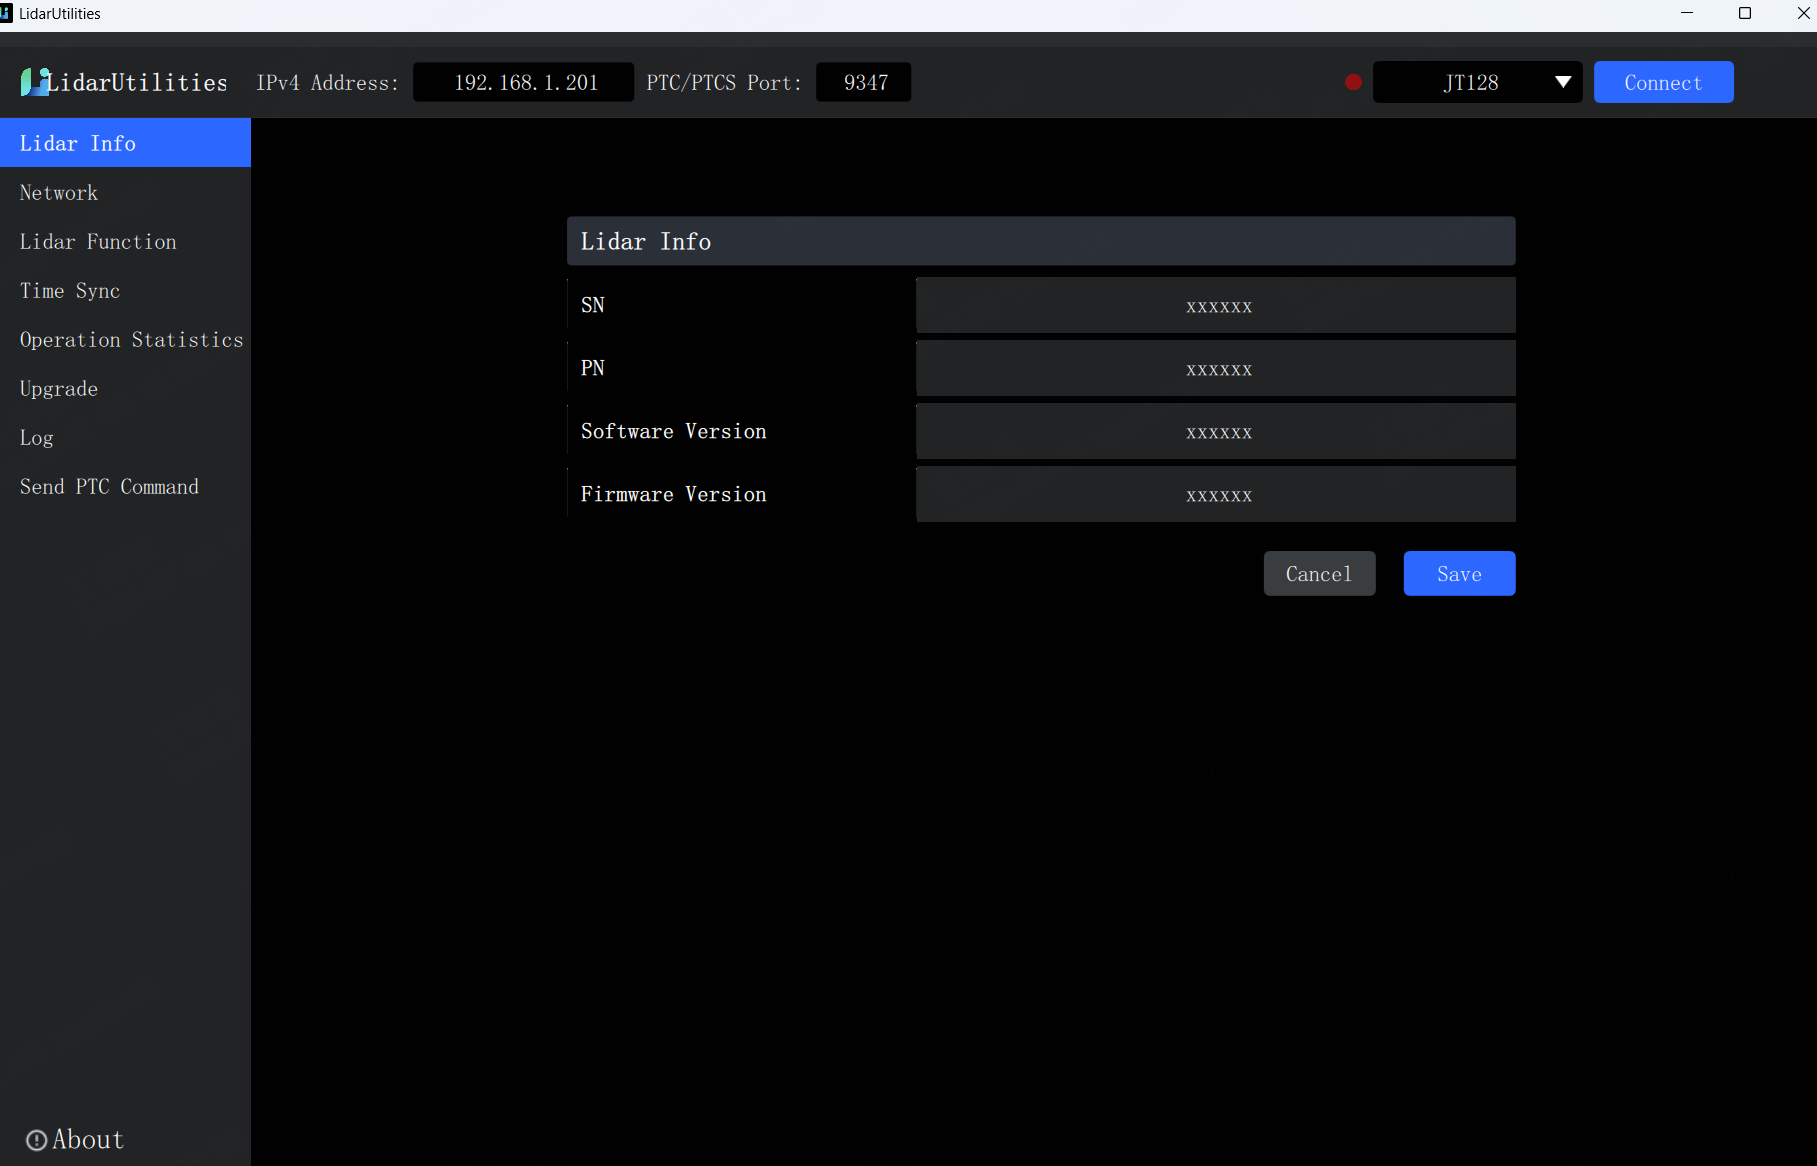
- Enter the upgrade page: After the connection is successful, click the Upgrade tab on the tool interface to enter the upgrade page.
- Upload the upgrade patch: Click the Upload button on the Upgrade page, find the upgrade patch corresponding to the model in the pop-up file selection window, select it and click Confirm.
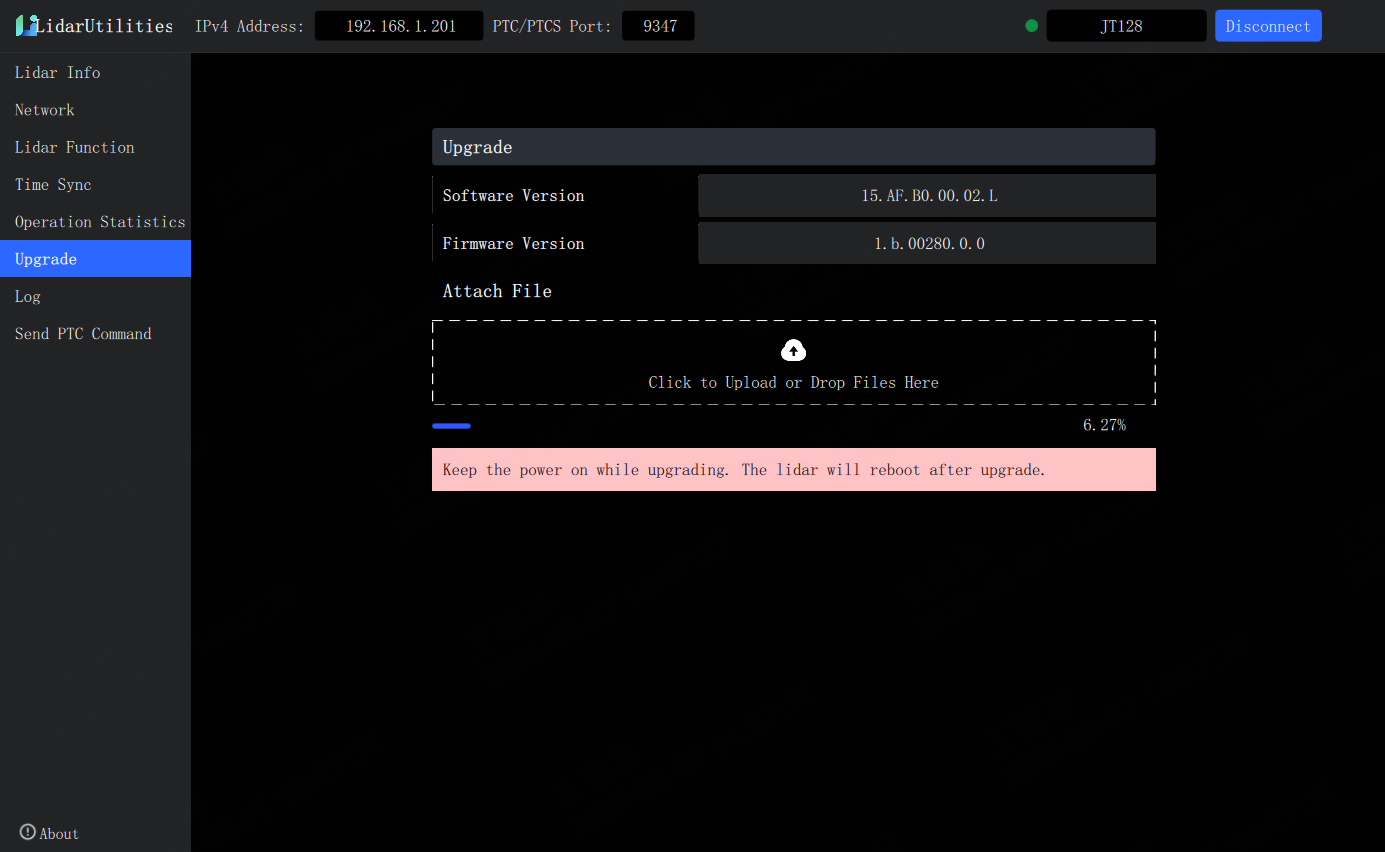
- Wait for the upgrade to complete: The upgrade starts automatically after the upgrade patch is uploaded, and a progress bar will be displayed on the interface. Wait until the progress reaches 100%. Do not close the tool or disconnect the network during the upgrade process.
4.3 Confirm Successful Upgrade
User can confirm whether the upgrade is successful through the following method:
Check the firmware version number: Reopen the LidarUtilities tool and connect to the lidar, check the firmware version number in the Lidar Info area on the homepage. If it is consistent with the target version number, the upgrade is successful.
5 Upgrade Method 3: API Command
5.1 HTTP API Command
Do not power off or disconnect during the upgrade process, otherwise the lidar firmware may be damaged (bricked) and require factory repair.
5.1.1 Pre-upgrade Preparation
Please confirm the following preparations before upgrading:
- The host device and the lidar are on the same LAN, and the lidar IP can be pinged successfully (refer to Ethernet Configuration).
- The correct upgrade patch file corresponding to the product model has been obtained from Hesai.
- The operating device has installed Python environment .
- Obtain HTTP upgrade commands information (please contact Hesai technical support).
5.1.2 Operation Steps
- Confirm that the lidar model supports HTTP API: HTTP API is only applicable to Hesai lidar models that support HTTP servers (including Pandar series, QT series, XT series, etc.). The commands supported by different models may vary, please refer to the HTTP API manual of the corresponding model.
- Prepare the upgrade script: User can refer to the sample code framework in Hesai official HTTP API operation guide. After running the script, the lidar will automatically execute the upgrade process.
- Wait for the upgrade to complete: After launching the script, the lidar will automatically complete the upgrade patch file transmission and upgrade, and will reboot automatically after the upgrade is completed.
5.1.3 Confirm Successful Upgrade
User can confirm whether the upgrade is successful through the following methods:
- Check the firmware version number: Obtain device information (device_info) through HTTP API to check the firmware version number. If it is consistent with the target version number, the upgrade is successful.
- Other methods: User can also ping the lidar IP to confirm whether the reboot is successful, or connect with the LidarUtilities tool to check the version number.
5.2 PTC API Command
Do not power off or disconnect during the upgrade process, otherwise the lidar firmware may be damaged (bricked) and require factory repair.
5.2.1 Pre-upgrade Preparation
Please confirm the following preparations before upgrading:
- The host device and the lidar are on the same LAN, and the lidar IP can be pinged successfully (refer to Ethernet Configuration).
- The correct upgrade patch file corresponding to the product model has been obtained from Hesai.
- The operating device has installed Python environment.
- Obtain the upgrade script: API_Demo.
5.2.2 Operation Steps
PTC command upgrade uses either one of two commands: 0xFF (subcode=0x0000000D) or 0x83, depending on the product model. Please select the corresponding operation steps below according to the lidar model. For specific applicable models, please refer to the table shown in Quick Start above.
5.2.2.1 0xFF Command
0xFF is a PTC extended command, and the subcode corresponding to firmware upgrade is 0x0000000D (SET_UPLOAD_FOTA_PPK). When sending an extended command, the PTC header command byte is set to 0xFF, and the actual subcommand is placed at the beginning of the data payload in 4-byte format.
Official script: FOTA_Upgrade_ATP_FT.py
- Run the upgrade script: Replace the IP, port, and network name in the script with the actual parameters.
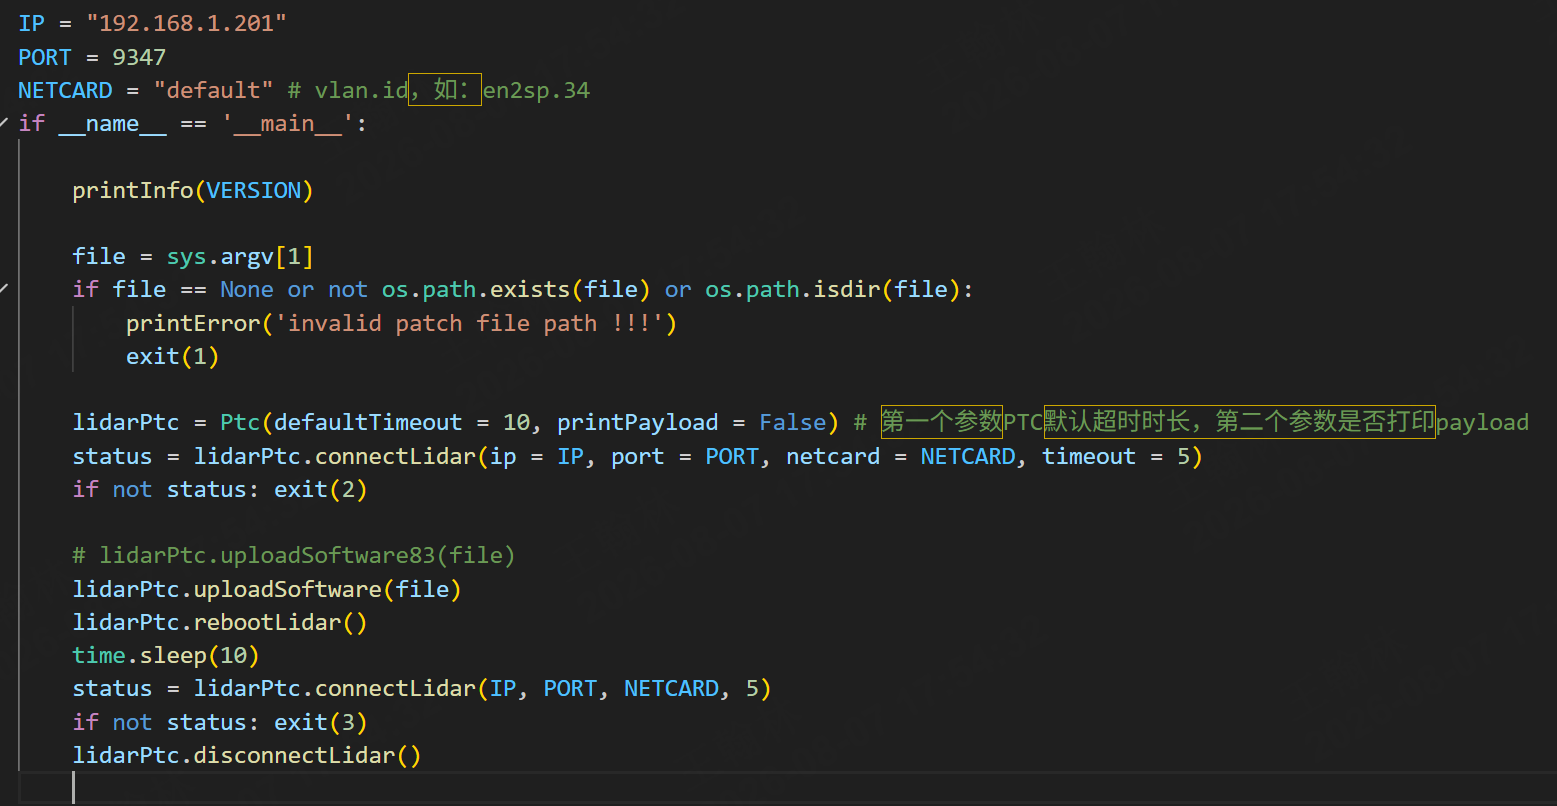
Open the terminal (use cmd/PowerShell for Windows, terminal for Mac/Linux), execute the command: python "script file path" "firmware file path". Here is an example command: python "C:\Users\Desktop\FOTA_Upgrade_ATP_FT.py" "your firmware.patch".
- Wait for automatic execution: The script will automatically complete all operations including connection, upgrade patch transmission, and upgrade. No additional operations are required during the whole process, just wait patiently for a few minutes.
- lidar automatic reboot: The lidar will reboot automatically after the upgrade is completed.
5.2.2.2 0x83 Command
0x83 is the PTC standard firmware upgrade command (FOTA_REQUEST_UPGRADE). Unlike 0xFF, 0x83 does not require a subcode, and the PTC header command byte can be directly set to 0x83.
Official script: FOTA_Upgrade.py
- Run the upgrade script: Replace the IP, port, and network name in the script with the actual parameters.
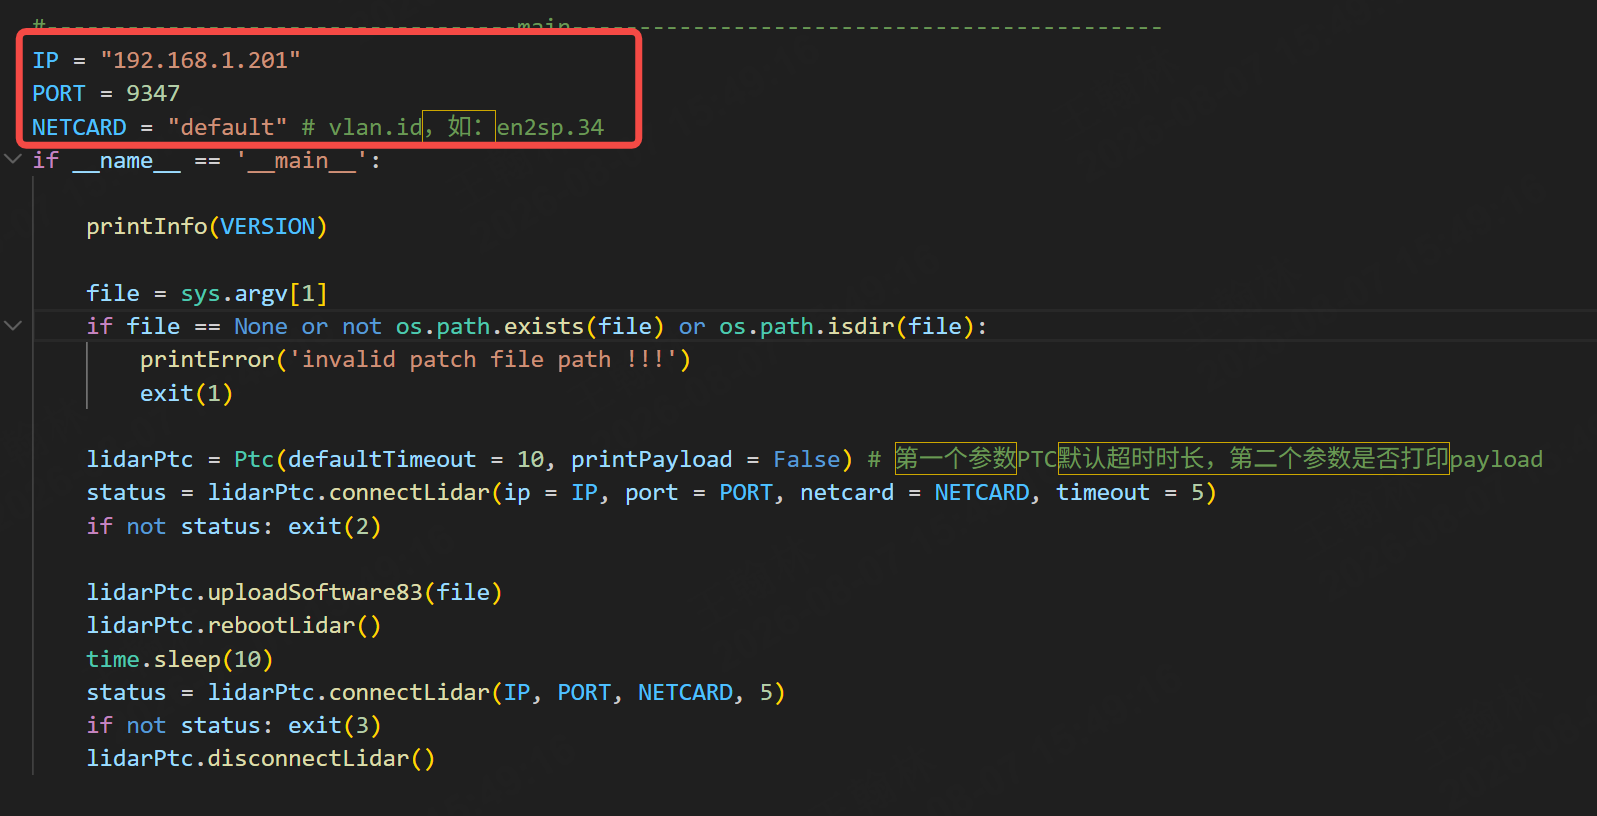
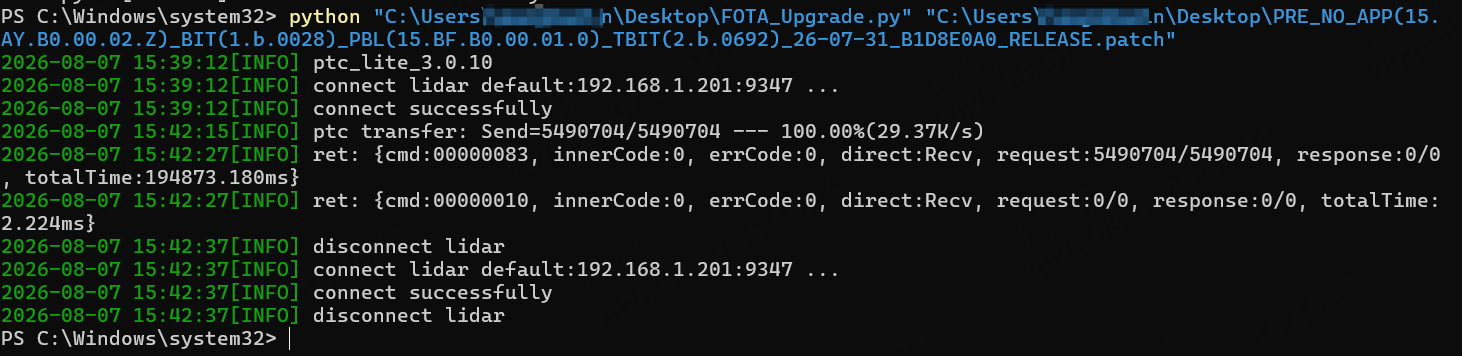
Open the terminal (use cmd/PowerShell for Windows, terminal for Mac/Linux), execute the command: python "script file path" "firmware file path". Here is an example command: python "C:\Users\Desktop\FOTA_Upgrade.py" "your firmware.patch".
- Wait for automatic execution: The script will automatically complete all operations including connection, upgrade patch transmission, and upgrade. No additional operations are required during the whole process, just wait patiently for a few minutes.
- lidar automatic reboot: The lidar will reboot automatically after the upgrade is completed.
5.2.3 Confirm Successful Upgrade
User can confirm whether the upgrade is successful through the following methods:
- Check the terminal output: If the terminal outputs a prompt similar to Upgrade successful, the upgrade is successful.
- Other methods: User can also ping the lidar IP to confirm that the reboot is successful, or connect with the LidarUtilities tool to check the version number.
6 Upgrade Method 4: Serial Port Command
Do not power off or disconnect during the upgrade process, otherwise the lidar firmware may be damaged (bricked) and require factory repair.
6.1 Pre-upgrade Preparation
Please confirm the following preparations before upgrading:
- One USB to serial port cable.
- JT16_Upgrade.py and JT32_Upgrade.py.
- Contact Hesai technical support to obtain the upgrade patch corresponding to the lidar model.
6.2 Operation Steps
-
Connect the hardware: According to the corresponding instructions in the product manual (JT16 / JT32), connect the RS485 and RS232 interfaces of the lidar with a USB to serial port cable, and plug the other end into the USB interface of the operating device.
-
Configure serial port permissions: The configuration methods are as follows according to different operating systems:
Ubuntu/Linux: Enterls /dev/ttyUSB*in the terminal to view the identified serial port devices (usually/dev/ttyUSB0and/dev/ttyUSB1), executesudo chmod 666 /dev/ttyUSB0andsudo chmod 666 /dev/ttyUSB1to enable read and write permissions.
Windows: Check the identified COM port numbers (such asCOM3,COM4) in Device Manager, no additional permission configuration is required. -
Install dependencies: Both scripts receive configuration through command line parameters, no need to modify the script code. Install dependency patchs:
pip install pyserial(required for both scripts), and JT16 additionally requirespip install crc. -
Execute the upgrade program: First use the
--list-portsparameter to view available serial ports (such aspython JT32_Upgrade.py --list-ports), then execute the corresponding command according to the lidar model.
- JT32:
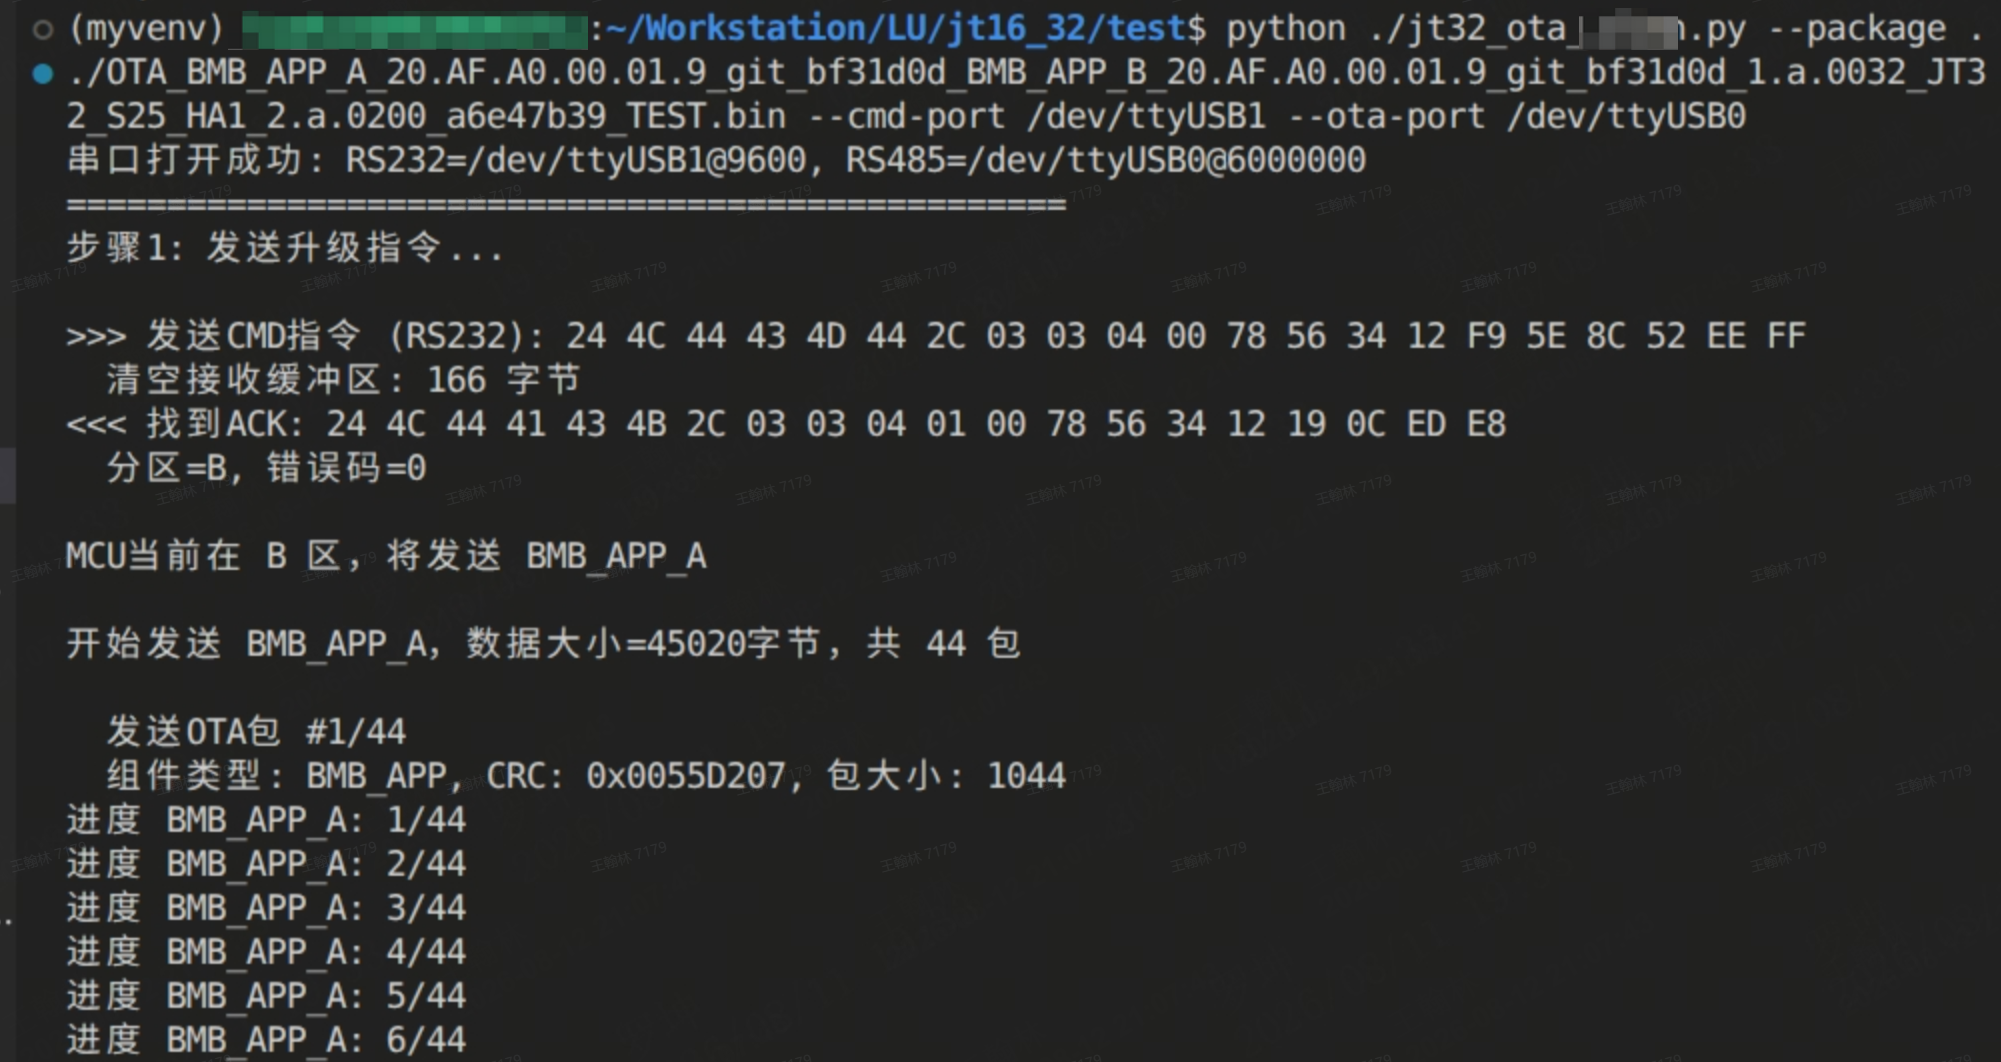
python JT32_Upgrade.py --patch <firmware patch path> --cmd-port <RS232 serial port> --ota-port <RS485 serial port> - JT16:
python JT16_Upgrade.py --patch <firmware path> --cmd-port <CMD serial port> --ota-port <OTA serial port>.
The script will automatically complete the entire upgrade process. JT32 requires manual reboot after the upgrade is completed, while JT16 completes automatically.
6.3 Confirm Successful Upgrade
User can confirm whether the upgrade is successful through the following method:
Check the program output: JT32 requires manual reboot after the upgrade is completed, while JT16 will reboot automatically. After the reboot is completed, check the version information through commands or LidarUtilities. If it is the target version, the upgrade is successful.