Synchronize Time using PTP
1 Overview
Hesai lidar products support PTP (Precision Time Protocol), which allows users to achieve precise time synchronization among multiple sensors.
2 Application Method
The method of using PTP time synchronization feature is as follows:
2.1 Parameter Configuration
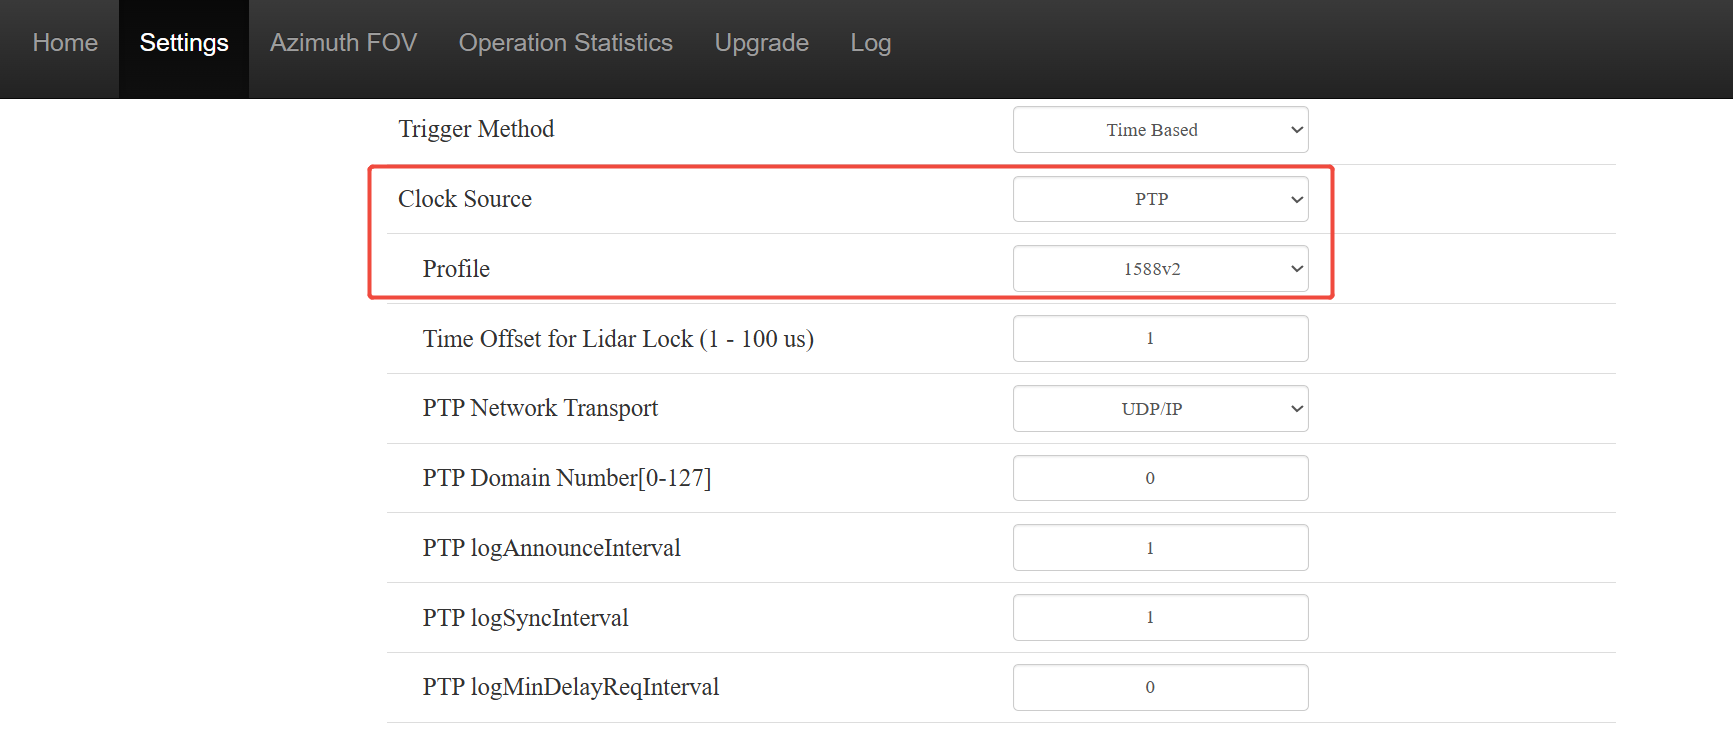
Configure PTP related settings of the lidar through web control page or LidarUtilities (see below figures, for the detailed information of each parameter setting please refer to the user manual of corresponding product):
Web control page - Settings (Pandar series/QT series/XT series)
LidarUtilities - Time Sync (OT128 / AT128P / etc.)
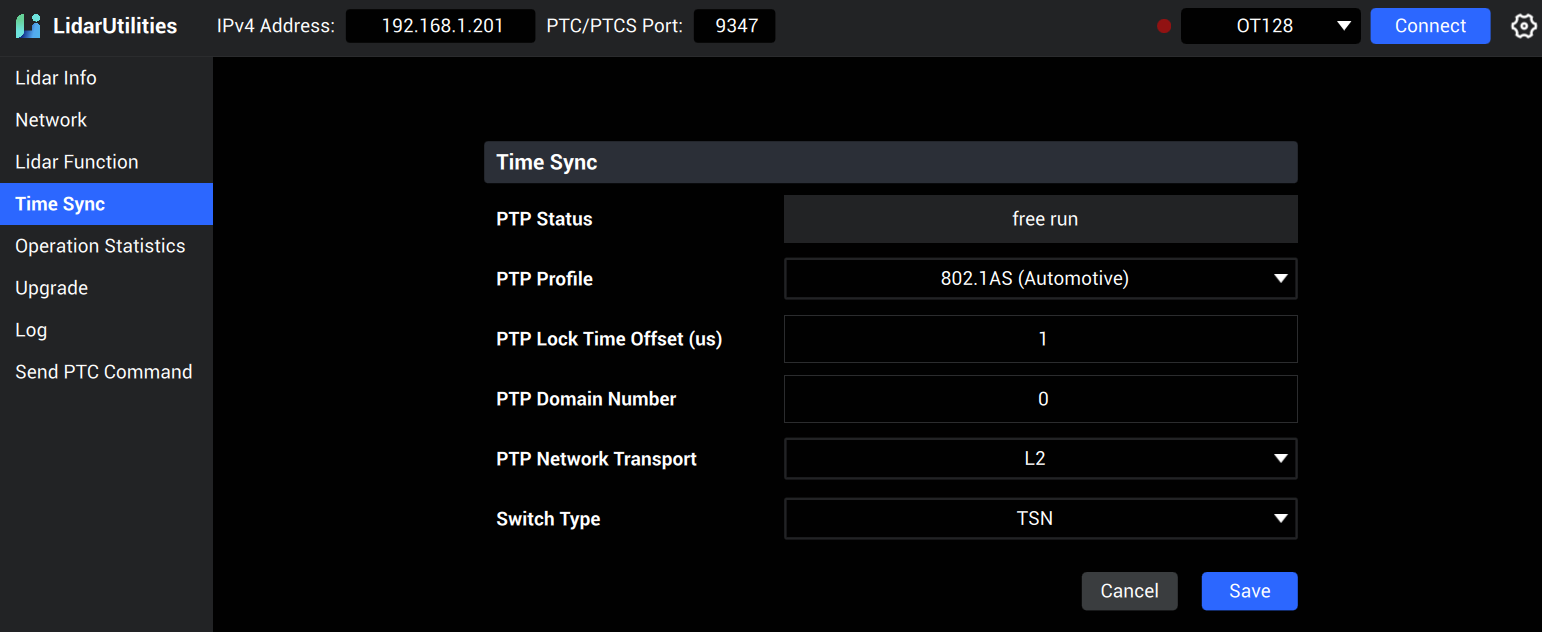
Note: LidarUtilities can be downloaded from Hesai's official website (OT128,AT128P).
2.2 Performing PTP Time Synchronization
After connecting the lidar to the external clock source device, configure clock source to PTP master and start time synchronization between the lidar and the PTP master.
Hesai lidar products support PTP time synchronization using software simulation or dedicated hardware clock device, with the detailed application method introduced as follows:
2.2.1 PTP Time Synchronization through Software Simulation
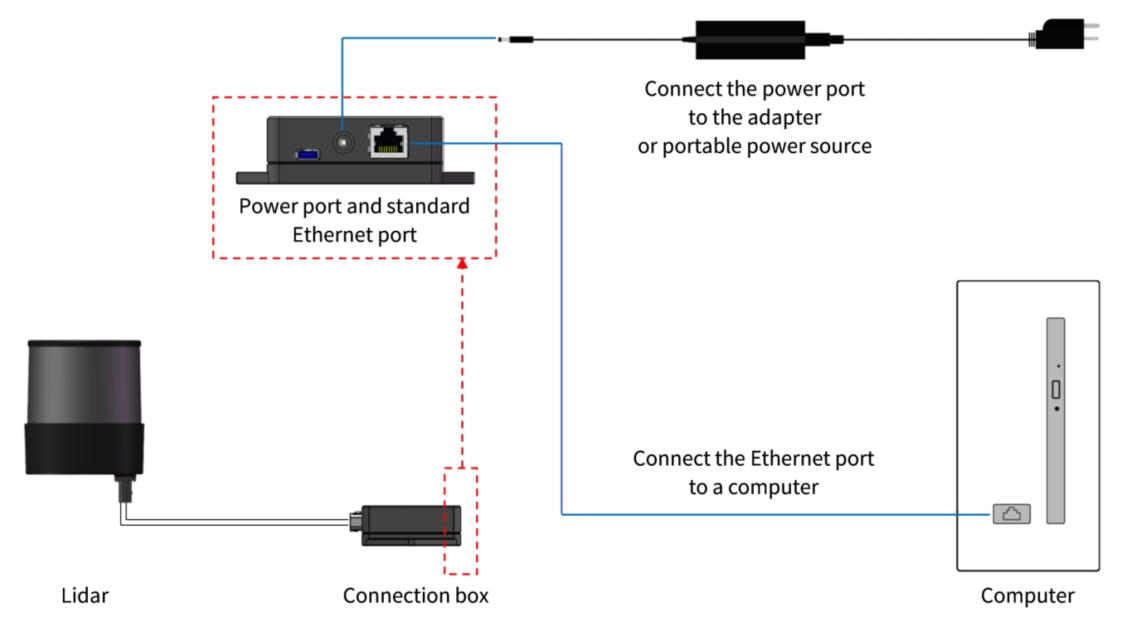
Please refer to the below figure for the hardware connection method of PTP time synchronization through software simulation:
For different types of PTP protocols, the PTP master can be configured in an Ubuntu OS PC according to the following methods:
2.2.1.1 1588v2 Protocol
For 1588v2 protocol, the commonly used open-source PTP time synchronization simulation software includes linuxptp and ptpd, with the corresponding configuration methods introduced as follows:
2.2.1.1.1 linuxptp (recommended)
- Installation
sudo apt-get install linuxptp
- Use 'ethtool' command to check the PTP synchronization functions supported by the network interface of host computer
sudo apt-get install ethtool
sudo ethtool -T <network interface name>
Note: For the method of checking the network interface name of host computer, please refer to How to Check Network Interface Name of Host Computer in Ubuntu OS.
-The terminal will print the below information:
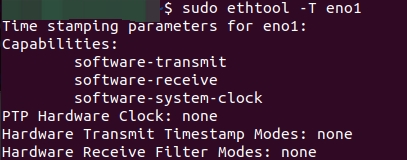
The hardware or software displayed here indicates whether the network interface has hardware timestamp capability or only supports software timestamp.The synchronization accuracy of hardware timestamps can reach several microseconds or even lower, while the time synchronization error using software timestamps is generally larger than that with hardware timestamps.
- Run the following command to configure the host computer network interface as PTP master and start time synchronization
Check the 'Network Transport' option in 2.1 Parameter Configuration first and perform the corresponding operation.
- 3.1 Network Transport -> UDP/IP
sudo ptp4l –m -4 –i <network interface name> –S
- 3.2 Network Transport -> L2
sudo ptp4l –m -2 –i <network interface name> –S
- Observe the printed message in terminal, when the network interface shows the Grand Master status, it means the host computer is successfully configured as PTP master:

When the PTP status displayed on the web control page or LidarUtilities interface of the lidar is updated to Tracking or Locked and the offset value changes continuously, it means the time synchronization between the lidar and the PTP master is successfully established (as shown in the below figures):
Web control page - Home (Pandar series/QT series/XT series)
LidarUtilities - Time Sync (OT128/ AT128P / etc.)
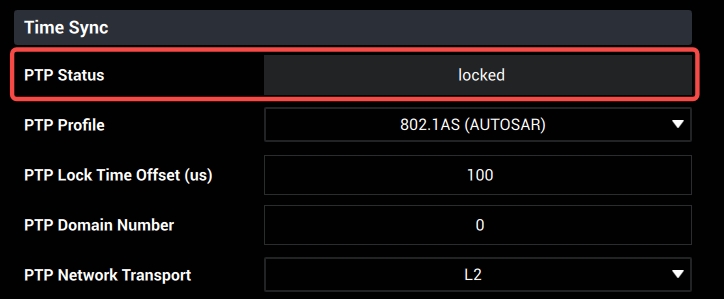
Note that when the PTP status of Hesai lidar products is displayed as'Tracking', it only means that the timestamp offset (Master Offset) between the current lidar and PTP master does not meet the 'Time Offset' parameter threshold corresponding to the'Locked'status (this threshold can be configured in the lidar's control page, default value is ±1μs, maximum support to ±100μs), while actually the lidar is already in a normal PTP time synchronization state.
2.2.1.1.2 ptpd
- Installation
sudo apt-get install ptpd
- Run the following command to configure the host computer network interface as PTP master and start time synchronization
sudo ptpd -i <network interface name> -C -M
- Observe the printed message in terminal, when the network interface shows the PTP_MASTER status, it means the host computer is successfully configured as PTP master:

When the PTP status displayed on the web control page or LidarUtilities interface of the lidar is updated to Tracking or Locked and the offset value changes continuously, it means the time synchronization between the lidar and the PTP master is successfully established.
Note: For synchronizing multiple lidars with 1588v2 protocol, simply add a switch to the network to forward PTP packets between the PTP master and each lidars. This process does not affect the configuration methods on the PTP master as mentioned above.
2.2.1.2 802.1AS Protocol
2.2.1.2.1 PTP synchronization on a single lidar
For PTP time synchronization using 802.1AS protocol on a single lidar, it is recommended to use the LinuxPTP software tool for configuration. The operation method is as follows:
- Installation
sudo apt-get install linuxptp
- Use 'ethtool' command to check the PTP synchronization functions supported by the network interface of host computer
sudo apt-get install ethtool
sudo ethtool -T <network interface name>
- Run the following command to configure the host computer network interface as PTP master and start time synchronization
- 3.1 Create gPTP.cfg file
touch gPTP.cfg
- 3.2 Select the gPTP.cfg file content based on the master's profile configuration
a. Standard 802.1AS Profile
Copy the following content to gPTP.cfg:
[global]
gmCapable       1
priority1       248
priority2       248
logAnnounceInterval 0
logSyncInterval     -3
syncReceiptTimeout  3
neighborPropDelayThresh 800000
min_neighbor_prop_delay -20000000
assume_two_step     1
path_trace_enabled  1
follow_up_info      1
transportSpecific   0x1
ptp_dst_mac     01:80:C2:00:00:0E
network_transport   L2
delay_mechanism     P2P
domainNumber        0
Note: Some Hesai lidar products (e.g. OT128, AT128P) support the option of 802.1AS (AUTOSAR) profile, which uses the same PTP master parameter configuration as standard 802.1AS profile.
b. 802.1AS Automotive Profile
Copy the following content to gPTP.cfg:
[global]

# Options carried over from gPTP.

gmCapable		1
priority1		248
priority2		248
logSyncInterval		-3
syncReceiptTimeout	3
neighborPropDelayThresh	800
min_neighbor_prop_delay	-20000000
assume_two_step		1
path_trace_enabled	1
follow_up_info		1
transportSpecific	0x1
ptp_dst_mac		01:80:C2:00:00:0E
network_transport	L2
delay_mechanism		P2P
#

# Automotive Profile specific options

#
BMCA			noop
serverOnly		1
inhibit_announce	1
asCapable		true
inhibit_delay_req	1
- 3.3 Run command below in the gPTP.cfg file directory
sudo ptp4l -S -i <network interface name> -m -f gPTP.cfg
- Check the print message in terminal
a. Standard 802.1AS protocol
When the network interface shows the following status, the host is properly configured as the PTP master clock:

b. 802.1AS Automotive protocol
When the network interface shows the following status, the host is properly configured as the PTP master clock:

When the PTP status displayed on the web control page or LidarUtilities interface of the lidar is updated to Tracking or Locked and the offset value changes continuously, it means the time synchronization between the lidar and the PTP master is successfully established.
2.2.1.2.2 PTP synchronization on multiple lidars
To perform time synchronization on multiple lidars from the same network using 802.1AS protocol, it is necessary to first confirm whether the switch model used supports TSN (i.e. Time Sensitive Network, an extension protocol stack of IEEE 802.1 which is aimed at providing a universal time sensitive mechanism for the data link layer of Ethernet protocol to ensure real-time and reliable data transmission).
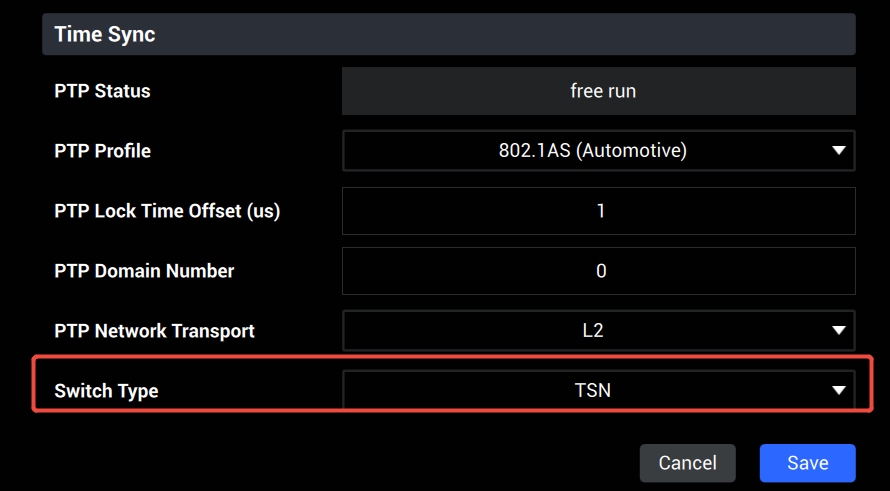
- For the switch that supports TSN, set the 'Switch Type' parameter of each lidar to 'TSN' (as shown in the figures below), and configure the host computer as the PTP master according to method introduced above for a single lidar. When the PTP status displayed on the web control page or LidarUtilities interface of the lidar is updated to Tracking or Locked and the offset value changes continuously, it means the time synchronization between the lidar and the PTP master is successfully established.
Web control page - Home (Pandar series/QT series/XT series)
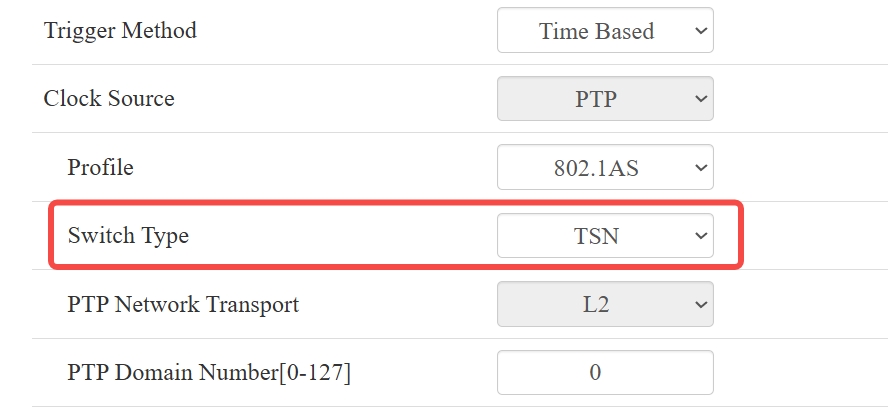
LidarUtilities - Time Sync (OT128/ AT128P)
- For the ordinary type switch that does not support TSN, it is not possible to directly use standard Linuxptp software to achieve gPTP time synchronization for multiple lidars. Instead, users can refer to the following method to modify part of the source code in the original LinuxPTP program and make it compatible with the network using regular switches that can achieve gPTP time synchronization on multiple lidars:
- 2.1 Clone local linuxptp folder
git clone https://github.com/richardcochran/linuxptp.git
- 2.2 Create new ptp4l.diff file
touch ptp4l.diff
- 2.3 Copy the following code to ptp4l.diff
python
diff --git a/port.c b/port.c
index b7fbfb1..3cd0ba4 100644
--- a/port.c
+++ b/port.c
@@ -2278,21 +2278,10 @@ int process_pdelay_req(struct port *p, struct ptp_message *m)
	p->delayMechanism = DM_P2P;
	port_set_delay_tmo(p);
	}
- if (p->peer_portid_valid) {
- if (!pid_eq(&p->peer_portid, &m->header.sourcePortIdentity)) {
- pr_err("%s: received pdelay_req msg with "
- "unexpected peer port id %s",
- p->log_name,
- pid2str(&m->header.sourcePortIdentity));
- p->peer_portid_valid = 0;
- port_capable(p);
- }
- } else {
	p->peer_portid_valid = 1;
	p->peer_portid = m->header.sourcePortIdentity;
- pr_debug("%s: peer port id set to %s", p->log_name,
- pid2str(&m->header.sourcePortIdentity));
- }
+ //pr_debug("%s: peer port id set to %s", p->log_name,
+ // pid2str(&m->header.sourcePortIdentity));

	rsp = msg_allocate();
	if (!rsp) {
@@ -2475,8 +2464,8 @@ int process_pdelay_resp(struct port *p, struct ptp_message *m)
        }

	if (!p->peer_delay_req) {
- pr_err("%s: rogue peer delay response", p->log_name);
- return -1;
+ //pr_err("%s: rogue peer delay response", p->log_name);
+ return 0;
	}
	if (p->peer_portid_valid) {
		if (!pid_eq(&p->peer_portid, &m->header.sourcePortIdentity)) {
-
2.4 Move the ptp4l.diff to the linuxptp folder
-
2.5 Open a new terminal in the linuxptp folder and run the following commands in order:
make clean
make
patch -p1 < ptp4l.diff
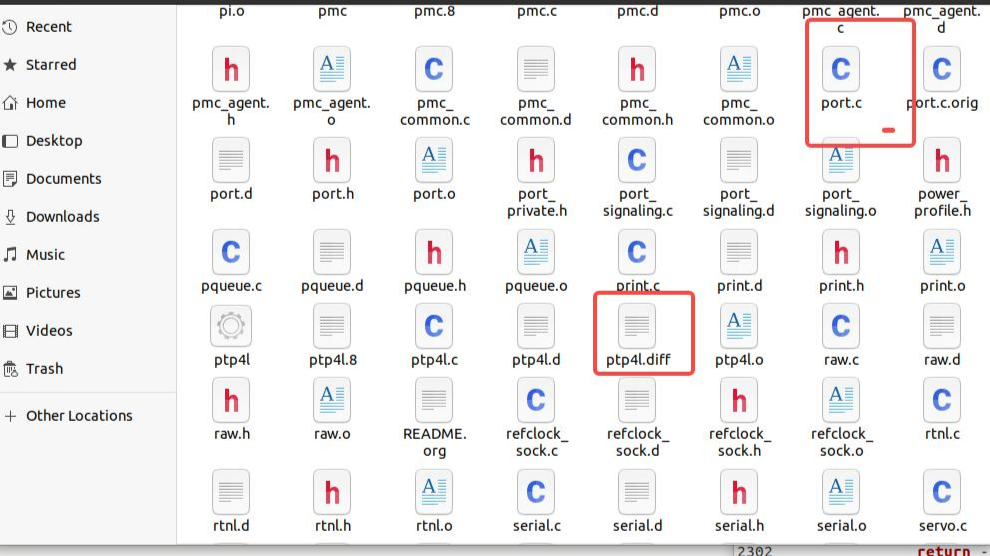
After running the above commands, check the print in terminal. If two Hunk messages appear as shown in the below figure, it means the modification is successful:
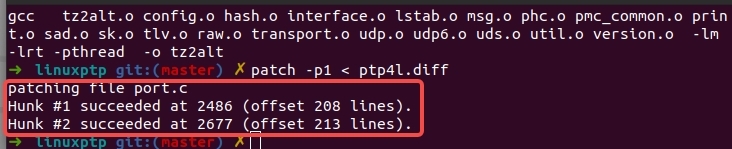
The changes in ptp4l.diff are now applied to port.c file in linuxptp (see effect below):
- 2.6 Recompile linuxptp
make
- 2.7 Confirm lidar parameter configuration
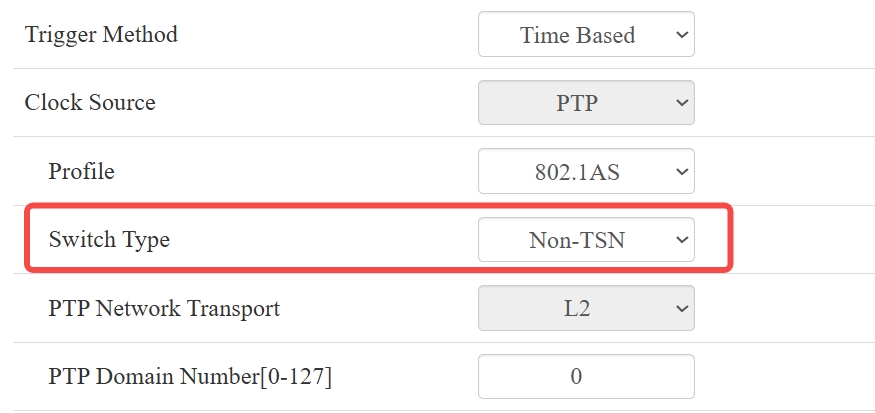
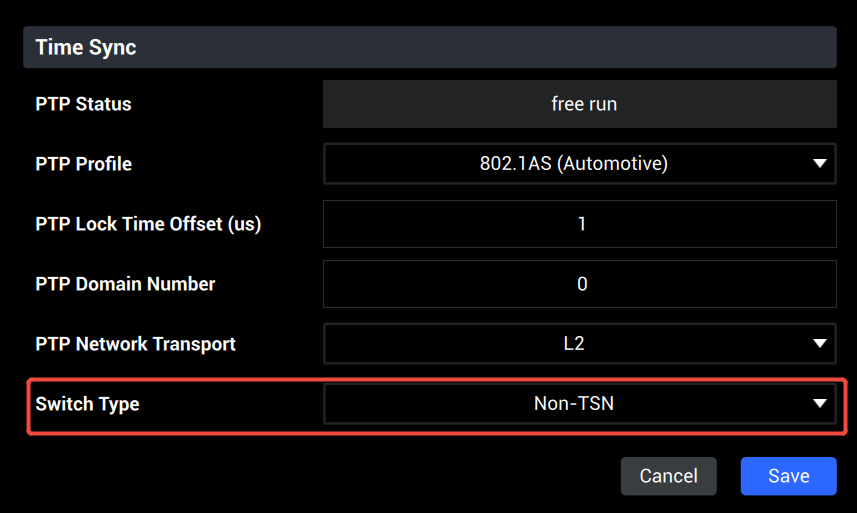
Set the 'Switch Type' parameter of each lidar to 'Non-TSN' (as shown in the figures below).
Web control page - Home (Pandar series/QT series/XT series)
LidarUtilities - Time Sync (OT128 / AT128P / etc.)
- 2.8 In the linuxptp folder, run the following command according to PTP profile configuration:
sudo ./ptp4l -S -i <network interface name> -f configs/automotive-master.cfg -l 7 -m
The terminal will keep refreshing, showing master sync timeout
When the PTP status displayed on the web control page or LidarUtilities interface of the lidar is updated to Tracking or Locked and the offset value changes continuously, it means the time synchronization between the lidar and the PTP master is successfully established.
2.2.2 PTP Time Synchronization through Hardware Device
Please refer to the below figure for the hardware connection method of PTP time synchronization through a dedicated hardware clock device:

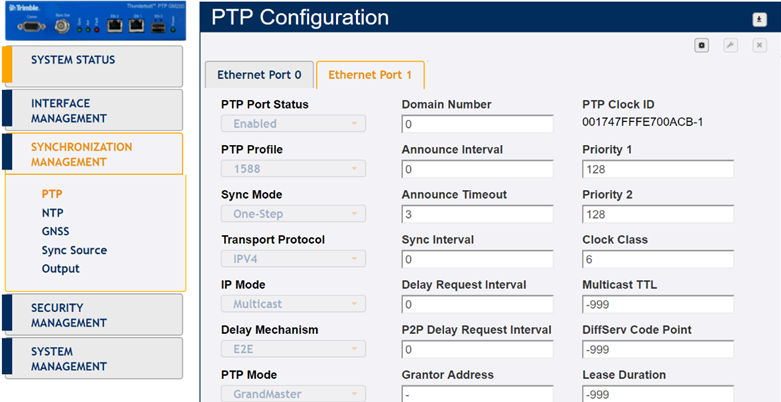
This PTP time synchronization method can typically achieve higher time synchronization accuracy (< 1μs).Similar to the software simulation method, users needs to configure the required PTP master parameters based on the selected PTP protocol and start the time synchronization process correctly according to the operation guidance of the hardware device (the following figure shows the parameter configuration interface of Trimble Thunderbolt GM200, a dedicated PTP master device).
After the hardware device is successfully configured as PTP master and starts PTP time synchronization, it can be confirmed whether the lidar is under the normal synchronization state by monitoring the PTP status of the lidar (which should be Tracking or Locked) and the timestamp information contained in the received point cloud data.
3 Common PTP Time Synchronization Issues Troubleshooting
3.1 Lidar cannot establish PTP time synchronization correctly
- Check whether the hardware connection of the PTP time synchronization network is good;
- Check whether the PTP synchronization message between the lidar and PTP master clock is correctly sent out (users can check the PTP protocol related messages in the data stream through use Wireshark software). If the message is sent out but not received, check whether the network bandwidth load could exceed the limit and cause packet loss;
- Check whether the PTP parameter configuration of the lidar is consistent with the parameter configuration of the PTP master. See detailed configuration method here.
3.2 Lidar's PTP time synchronization status is not stable
- Check whether the hardware connection of the PTP time synchronization network is good;
- Check whether the PTP master is working properly and whether there is any abnormal timestamp jump phenomenon occurred on the PTP master;
- Check whether the lidar can receive PTP Sync messages sent by the PTP master correctly (users can check the PTP protocol related messages in the data stream through use Wireshark software);
- For 1588v2 protocol, if there are multiple lidars or other devices connected to the current time synchronization network, and PTP time synchronization cannot be established or frequently switch to unlock status after synchronization, need to check whether the data volume transmitted in the network is close to the upper limit of Ethernet port bandwidth on the host computer. It is recommended to configure the parameter 'PTP Network Transport' on the lidar and PTP master to L2 to avoid the impact of IP network layer data load on the transmission of PTP messages at the receiving and transmitting Ethernet ports;
- For 802.1AS protocol, if the PTP time synchronization state of the lidar is unstable and switches between locked and unlock status, need to check whether the Sync message's period parameter (logSyncInterval) from the PTP master is consistent with this parameter from the lidar (for Hesei lidar products, this parameter is fixed at -3).
3.3 Other Issues
- If the LiDAR and host cannot ping each other after using a switch, check if the host IP is correct or use the following command:
sudo ip addr add <host IP>/<subnet mask, default 24> dev <ethernet port>
 #example: sudo ip addr add 192.168.1.100/24 dev eno1
If the lidar still has other PTP time synchronization issues after following the above methods, please contact Hesai Technical Support.
Find it useful?